Hey there!
So I was gone for a loooooong time, and I wanted to update you on some of the things that are going on!
As some of you know (but most of you do not know), I am on a long trip in South America, that began at October 2013, and will end at the end of February 2014.
Since I am on the go, I do not always have an internet connection, or am able to update frequently. I believe however, that this trip will help me grow as a person, and that way will also help me deliver even better content in the future, on this forum and in future websites I will set up (hint hint...) [=
As soon as I get back, I will make some changes, and there are tons of new things to expect.
Meanwhile I wanted to update you on my eBooks on Amazon!
The first one is Draw In Perspective By This Weekend: For the Extreme Beginner. This book will teach you the basics of how to draw in perspective, and then some more advanced things. The feedbacks I currently recieve are pretty good, so I recommend you give it a try!
My second eBook is How To Draw Roses: For The Extreme Beginner and The Seasoned Artist. I love this one! If you ever wanted to learn how to draw ROSES, this is the book for you! It is very comprehensive, and takes you step by step through the entire process. It even includes fun facts about roses... [=
This is it for this update. I am sorry they happen less often, but this will all change in the not-so-far-away future!
Truly yours,
- Liron
Hey there everyone!
So after so much work, and pouring my heart into my book, and publishing it, and marketing it..... It will soon GO FREE!!
So here is the deal...
My new eBook: "Draw IN Perspective By This Weekend - For The Extreme Beginner", will be up on Amazon for free, during the following time window:
Beginning time: This Saturday (14 of September), 12 A.M. Pacific Standard Time.
End time: This Sunday (15 of September), 11 P.M. Pacific Standard Time.
Here is the link:
Make sure you make it into this time gap, so you can get it for free!
As a side note, I believe this blog will also benefit from me writing this book. I feel like my writing and drawing skills have improved immensely. So even though it made me take a break, it also made me stronger and better in the long run!
Have fun and enjoy the freebie, and I will be back real soon!
- Liron
Hey guys!
I kind of owe you an apology, I haven't posted in a while. The reason for this is that I was literally hijacked to do a new project. I decided to write an Ebook, and to have it done withing a month!
And boy, I only missed the schedule by 3 days..
Here is what it looks like:
Whenever I get a new inspiration for a challenge or for creating something new, I like to ride that wave until completion. I am a burster. So I immersed myself completely in the creation of this Ebook.
Good news is - you can benefit from my hard work (=
The book is currently for sale on amazon, right here: Draw In Perspective By This Weekend: For the Extreme Beginner.
However - The book will soon be sold for the tempting price of 0.00$, for a few days, on my KDP Select campaign. Please follow me here to receive an update on when that is going to happen.
Besides that, I will also update that I will soon be on a four months backpacking vacation. I will do my best to make another drawing lesson relating to the book, BEFORE I leave. And during these four months I will make sure to update you on what is happening, and even make new drawing lessons if possible (still don't know what would be possible there).
Thank you so much for your patience. This blog is my baby and I am not leaving it!
And until next time....
- Liron
Hey world!
On today's drawing lesson you will learn how to draw this fish, and fish in general!
This is the third lesson on my "Super Simple Series"!
You can find more information and lessons from this series here: Super Simple Series (link will open in new window).
This lesson will be divided differently:
1. A detailed how to draw fish lesson.
2. An "infographic", summerizing the entire lesson.
1. How to Draw a Fish - Step by Step
Here is the whole process it took to draw this fish, and some more important tips on how to draw fish in general.
fish!
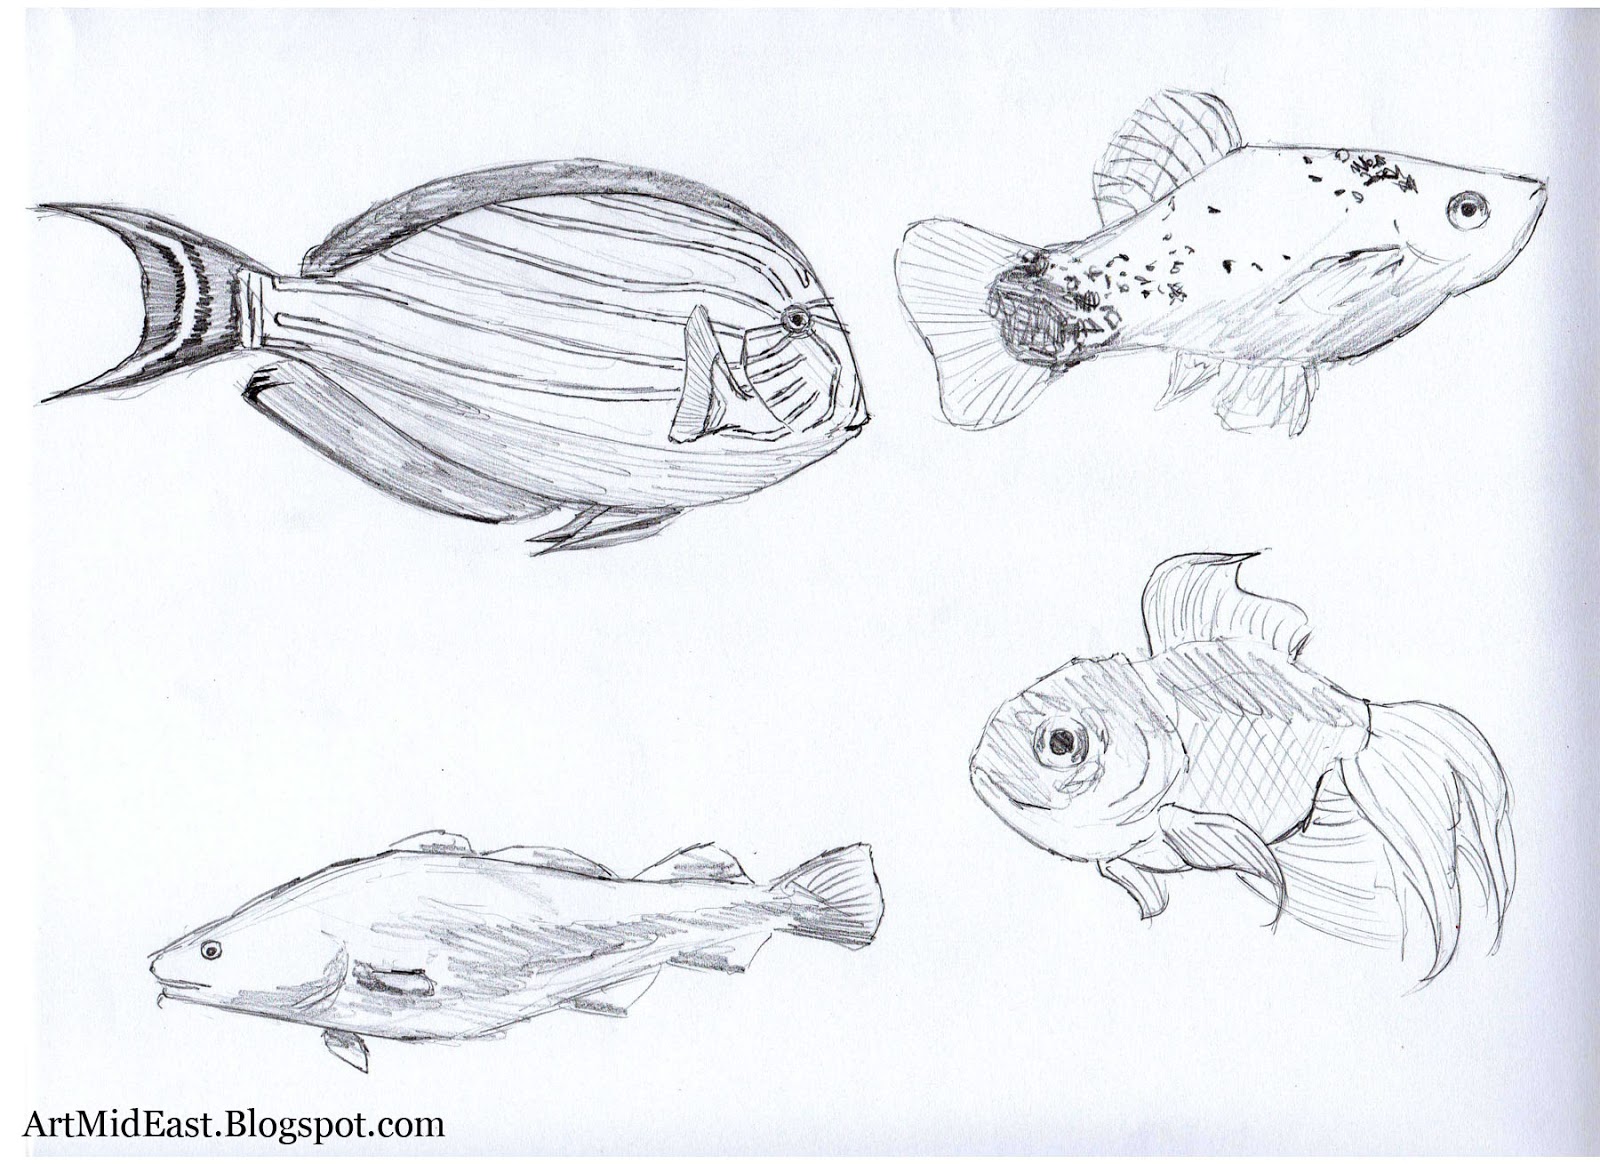
Here are a few drawings I've made, some of which are based on pictures I found on google.
After doing many of these, here are some general insights that helped me:
A. Most fish's bodies are actually built in a similar way. There are a few variations of body and fin shapes and sizes, but most of it is very similar. Consider these examples:
The fish look quite different from one another, but they all have fins on their top, size, tail, and bottom. Also, their bodies are shaped almost exactly the same. The only thing making a difference is their fins (which broaden / shorten the body's shape and size).
B. The gills are located right between the face and the side fins.
C. The scales are visible mainly on the bottom part of the body. Light that comes from the top (from the water's surface) creates a shinyness that hides the scales.
D. On the fins, there are sort of small "arms" that split into 2 parts (This is seen in the infographic too.
I saw this happen in many other fish. Do a little search [=
Now lets move on to the drawing process.
Step 1 - The body's front:
Draw two Perpendicular lines. The upper line is twice the length of the bottom line. Also make a small vertical line where I drew one. This will be used later to draw the mouth.
Step 2 - The body's center and back:
Draw the rest of the body using semi-straight lines. What I basically did was:
- Connecting another straight line to both lines from the previous step.
- Connecting a more curved line from these two lines, that leads to the back part of the body.
Also draw a small box on the back part of the body. This will help us with getting the tail fin on the next step.
Step 3 - The fins:
Draw the fins, using very basic triangles and squares. The only fin which is not triangular is the bottom back one, which is basically a curved rectangle. Make sure that you draw to connection of the back tail fin the way I did, to the small square from the previous step.
----
Check out my new website and subscribe for a FREE eBook! (=
LironYan.com
----
Step 4 - The face:
Draw the mouth using the guide line we drew earier. Notice that the lower "lip" protrudes more then the upper one. Also draw the eye, which is simply a black circle inside a white circle. Also draw the gills. As I said before, they are located between the side fin and the face (I didn't know that prior to making this lesson [= ).
Here is a zoom in on the face, isn't he beautiful?
Step 5 - Details of the fins:
Draw the small "arms" I talked about earlier. Notice again how the top fin's arms are splitting into 2 smaller "arms". Geez, there must be a scientific term for this, if anyone here happens to be a fish expert, please share it with the rest of us (=
Step 6 - Rounding the body and fins:
This step is barely visible here, but it is very important. Remember how we drew the body and fins based on straight lines and shapes? Now it's time to round the corners and curve the lines a little, as praparation for the inking. You can see what I did mainly on the connection of the tail, and the tail's fin.
Step 7 - Inking / Darkening
Ink / Darken the correct lines. Make sure you ink and darken the round lines we drew, and not the earlier, straighter lines.
Step 8 - Scales, texture and shading
Draw the scales. I used very simple cross hatching and quick lines, although you can take your time and draw more details. I also drew a darker area, beginning at the gills and ending at the tail. This kind of thing happens mostly on smaller fish. These fish tend to have a more transparent skin and body, so you can see their inside a little. Again, if any fish expert here has any idea what this dark area is, let us know [=
If you want to learn more on texture, shading and cross hatching, check out these drawing lessons as well: Sketching and Shading Techniques and How to Sketch - Sketching techniques (Elaborated).
Now all that's left to do is to erase the red pencil lines...
and here is your fish!
2. How to Draw a Fish - Step by Step - Summary
====================
With this I'll end today's lesson on how to draw a fish.
Follow me on Facebook, Twitter and Pinterest (With the buttons on the top of the right side bar) to see more pictures of me preparing this lesson, and share this lesson with your friends!
Next lesson will be on a badass animal (actually one that eats fish), can you guess which one.....?
Also, check out my new website and subscribe for a FREE eBook! (=
LironYan.com
Until next time,
- Liron
Hey people!
In today's drawing lesson you will learn
how to draw a Butterfly! This is the second lesson on my "Super Simple
Series"! You can find the first one here: How to draw a Lion - Step by step.
Read THIS post
to learn more about SSSeries.
Also, I've added an archive, including All of my drawing lessons. Feel free to check those out and maybe find older gems [=
This drawing lesson will be divided into two parts:
1. An "infographic", including the entire lesson, in a brief version (click to enlarge).
2. A more detailed lesson afterwards.
1. How to Draw a Butterfly - Step by step (scroll under the picture for part 2):
2. How to Draw a Butterfly- Step by Step: More in depth
For those who are interested in a more elaborated version, here is some more on the drawing process.
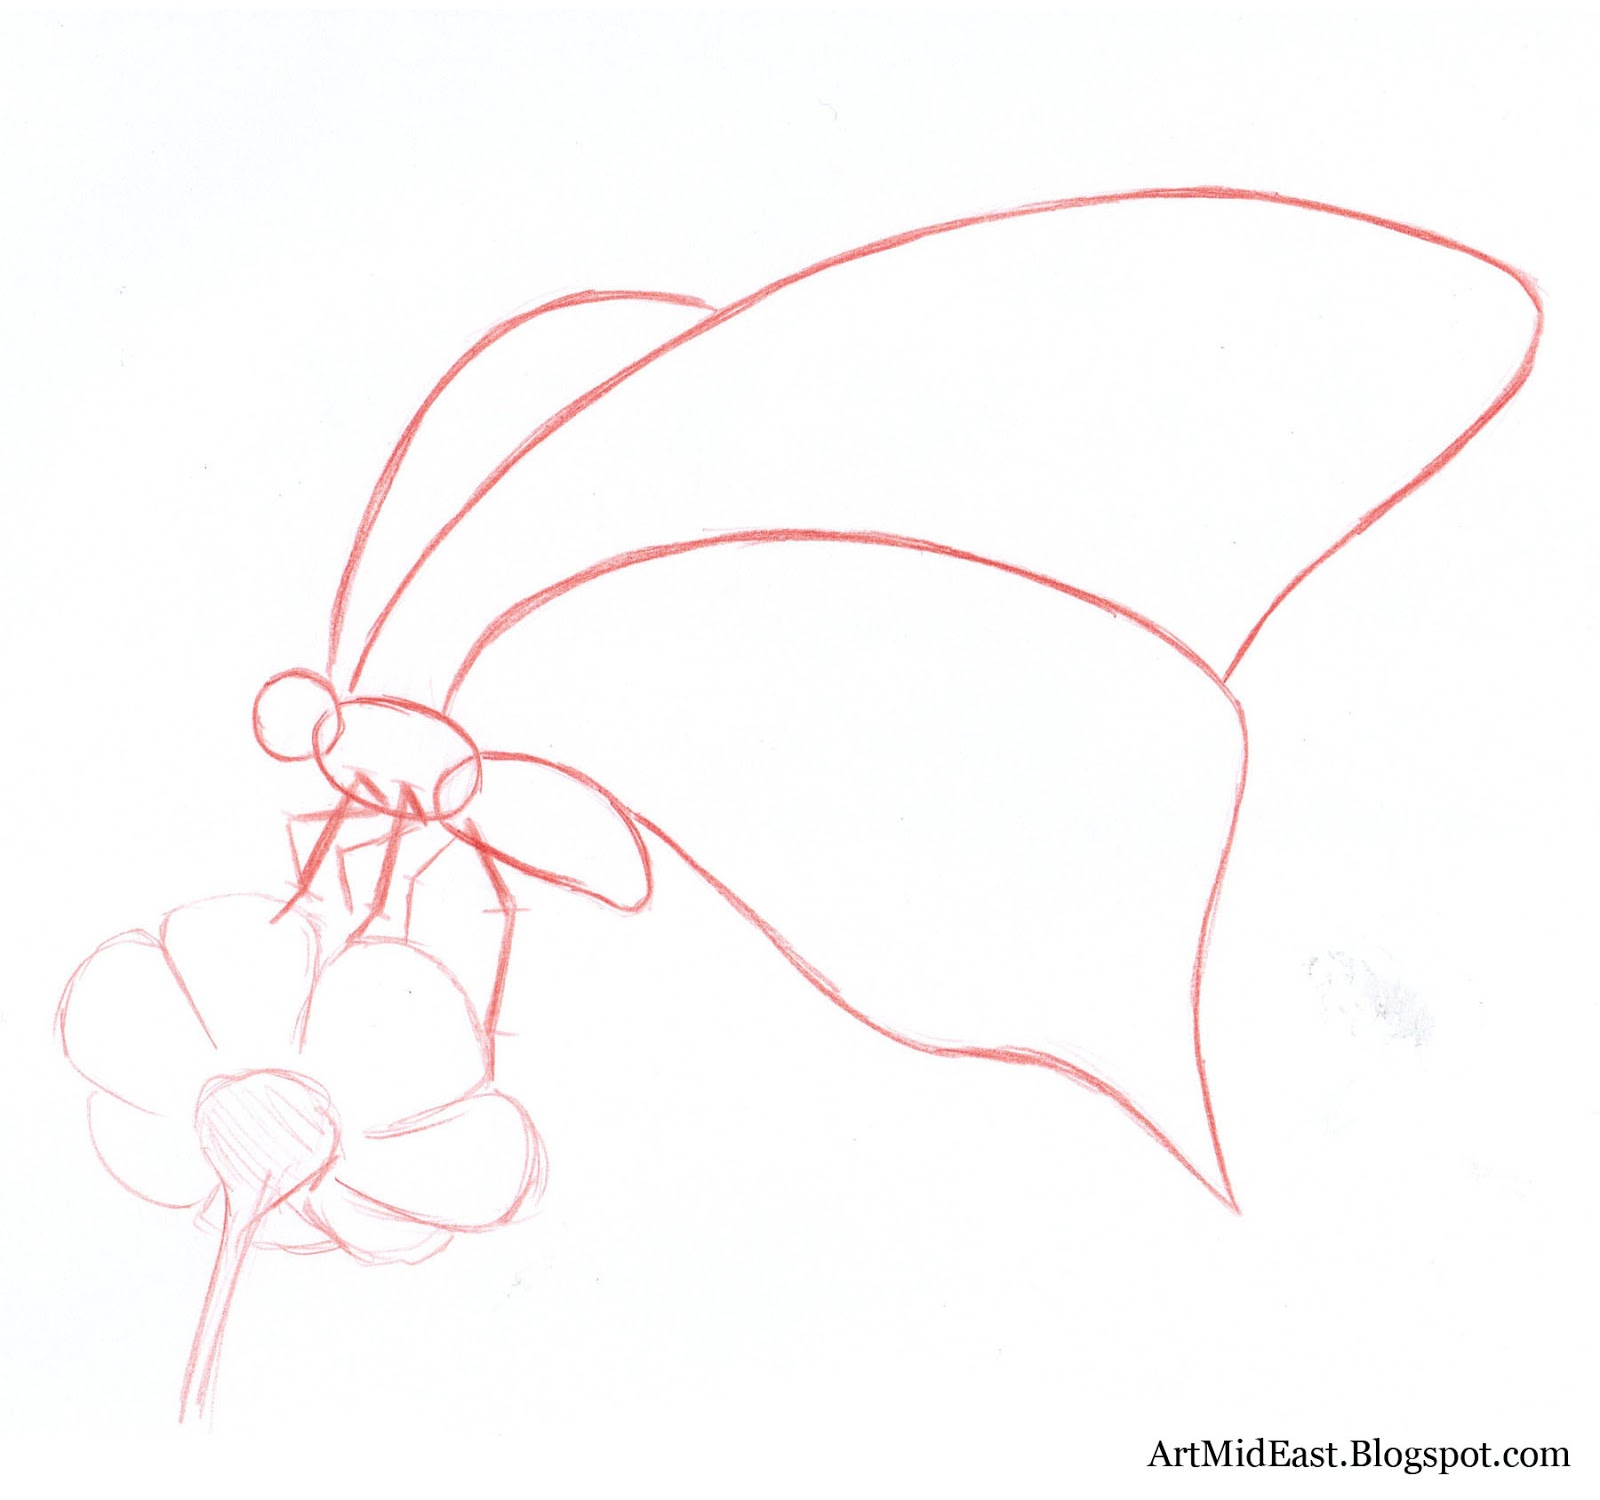
Step 1 - The body:
The body is composed of 3 oval shapes, one for the head, a second one for the middle part of the body and a third one for the back part. The head is round, and the two other parts are elliptic.
Step 2 - The wings:
I added the wings. These are divided to two sections each. On the left wing you can't see the two parts, only the top one, since it's blocked by the right wing. I won't elaborate on the shape of the wings, since these vary A LOT. You can pretty much improvise and exaggerate a bit here, it all works. If you want to be accurate though, google "butterfly" and you will see many examples.
Step 3 - The legs:
Here you can see I added the legs. These are pretty simple. There are three legs on each side, making it a total of 6 legs. Each of the legs is divided to 3 parts.
Step 4 - Details of the head:
OK, so I drew the details of the head. There are two huge eyes (in comparison to the size of the head), one of them is almost entirely bocked from our vision by the head. I also added the antennae and proboscis (which is the pipe that sucks food).
Step 5 - Details of the body and wings
Here
I added details to the body and wings. I found that some butterflies have this fur like cover over their body, which I indicated lightly here. I also divided the back part of the body, and added a preparation for the details on the wings.
Step 6 - Inking
Here I inked almost all of the butterfly, except for the wings. I only drew the correct lines with ink (skipping over most of the body's ovals, and inking the fuzzy "fur").
Step 7 - Wings
Now we officially finished with the wings. I added a texture I saw in many butterflies. Feel free to change it on your drawing. Maybe even invent one of your own!
Now it's time to erase the pencil, and wrap this drawing up...
There you go!
How did your butterfly turn out? Feel free to upload your own drawing and share the link here in the comment box [=
====================
That wraps up today's lesson on how to draw a butterfly.
Again, Let me know how this new format is working out for you.
Follow me on Facebook, Twitter and Pinterest (With the buttons on the top of the right side bar) to see some pictures (and not scans!) of the process that didn't make it here. And as usual, please share this lesson with other people who may be interested, maybe even your kids!
And until the next drawing lesson....
- Liron [=
Hey people of the world!!
Today I want to inform you of some changes I'm making, and to present to you..... The Super Simple Series!
I feel like my drawing lessons are really in depth, and full of quality information. I do however want to try something a bit different. I wanted to make a series of lessons that will be good not only for intermediate artists, but also for beginners and kids.
So that's what this series of drawing lessons is all about. Simple and easy lessons. Good for kids and beginners. Step by step. I still don't know how many lessons will be in this series, but for now I assume it to be around 6.
====================
Drawing Lessons in the SSSeries (list will be updated):
1. How to draw a Lion
2. ?
====================
Please let me know if this improves the quality and the ability to learn from the lessons. If it does, I might stick with it for a longer while....
And also make sure you follow me on Facebook, Twitter and Pinterest (buttons to the right) for more cool stuff that don't make it to the drawing lessons.
Until next time....
- Liron
Hey world!
In this drawing lesson, you will learn how to draw clothes and folds!
The lesson will be built in a way that will allow you to build a good understanding of the basics, and to continue learning and improving on your own!
Before we begin with the drawing lesson itself, let me make something clear. Drawing folds and clothing is SUPER easy! The reason I say this, is because very little technique is actually required (of course - with some exceptions). The challenge in drawing folds in a realistic way however, is the fact that it does require a good understanding of how folds and fabric "behave" in different situations.
But, once you get the basics down, it becomes really simple, and my goal is to get you through the basics, so you can continue your journey by observation and self studying folds and clothing in more depth.
But enough with that, lets start drawing! We will begin with the basic types of folds.
Types Of Folds
Here I will present the basic types of folds. Some of these overlap, and some contain others within them. study the folds carefully, and create them on your own. My suggestion is to actually grab a small towel and follow my instructions. Do this, and you will understand these in no time!
Spiral folds
 |
| Click image to enlarge |
These are the type of folds that occur when a piece of fabric is "squeezed" on the body it is on. In order to understand this, wear a long sleeved shirt or a sweater, pull your sleeves up and look at the folds created. This type of folds is also common on some types of curtains, as well as waistbands that have a rubber band inserted into them (the rubber band pulls the fabric and creates these folds).
Notice I drew a simplified, red colored version to help you understand the basics of this type of fold. That's it for the spiral folds!
Zigzag folds
Here is the zigzag fold in all of it's might!
This fold occurs on the inside part of a fabric that is was bended many times, for example - in pants, behind the knees. Another good place to look for them is wearing a jacket and slightly bending your arms.
This type of folds looks sort of like square-ish diamonds, created by zigzagged lines. I find these pretty easy to draw, since you can throw a couple of zigzagged lines and that's about it (not taking into account the shading). Again - look at the red simplified version.
Something I will point out in a later part of this drawing lesson, is the thickness of the fabric. Look at how the two right examples are of thinner fabrics, and notice how it influences the thickness of the folds. We will see more of this in future examples.
For more in depth explanation, check out my new eBook, which is The BEST, cheapest resource out there on drawing FOLDS and CLOTHES. Get your copy now and MASTER this skill-set!
Diaper folds
Here is a fun one....
Diaper folds are created when a fabric hangs on two points (or areas) of support. This typically happens when a towel is hanged to dry using two clips. These folds are pulled between the two points, creating somewhat rounded shapes, that "lead" to one of the points.
At the bottom right example you can see how there are two areas (not points) of support.
These are also pretty straight forward and simple to draw.
Half lock folds
This fold is a brother of the zigzag and spiral folds. It occurs when a fabric changes it's direction abruptly, causing it to layer on top of itself. This can be found in bended knees (similar to the zigzag folds, only in a different place) and arms. Again, look at the difference between thick and thin fabrics.
Pipe folds
One of my personal favourites. This fold is really versatile, and can be found in many places. One simple way to make it, is to grab a towel with both hands, and pull them away from each other. In pipe folds, the fabric is sort of "layered", not as much as it does in the half lock folds, but just enough to create these "pipes". Also look at both examples of curtains. In the bottom right one, notice how the pattern follows the shape of the pipes.
Drop folds
This type of folds is created when a fabric is hanging loosely from a point (or area) of support.
It is important to mention that this fold contains other types of folds, such as the pipe folds, but is more complicated, as it can contain many more shapes and folds (like on both examples on the right). The way to study these, since they can vary a lot, is by creating them. Take a towel, a shirt or whatever at hand, and hang it like you would with laundry, when you don't have a drier [= . You can also use a door knob for this, which is good, since it creates an area of support, which will help you to discover more varieties of this fold. After careful studying you will begin to have a feel for these folds, and they would become more fun to draw. Now onto the last type of folds...
----
Check out my new website and subscribe for a FREE eBook! (=
LironYan.com
----
Inert folds
I saved this for last for a good reason. A bit like drop folds, this type of fold is extremely versatile. The best way I found to study it, is to throw a piece of fabric on the floor, and to draw it. I have done it many times, specifically for this drawing lesson. What you will find, is that every time you drop the fabric - it looks different! But that's a good thing.
Since there are no clear "rules" to drawing it:
1. It cuts straight through techniques and "cheating", and actually forces you to understand how clothing and fabric works.
2. You can go all out when drawing it, and create a lot of complex folds, layers and shapes.
---------------------------------------------------------
These are all of the main types of folds. Now I would like to talk about a few other aspects that influence the way folds look like when drawn.
Thick fabric VS Thin fabric
Look at these examples. Thick fabrics usually lead to fewer, thicker folds. Thin fabrics usually lead to the creation of many thin, varied and layered folds. Also look at how the edges of the folds and fabrics make it look thick or thin.
Small VS Large quantity of fabric
The more fabric there is, the more folds are created. This is pretty intuitive, but also pay attention to the complexity of the folds. More fabric usually leads to more complex folds, and more layers and inert folds. Drawing a big piece of fabric, like a thin drapery, can actually become quite a challenge!
Points of support / Pulling of the fabric
The key here is understanding that folds are usually created in such a way that they are pointing towards (or away if you rather) the point of support, or the direction in which they are pulled. Look at the different examples to understand what I mean, and try manipulating the folds on a piece of clothing, and see how they "react".
Size of the object "wearing" the fabric
Nothing mind blowing here. Generally, the more the fabric is worn tightly on the object / body, the less folds we will see. Also, the folds that do occur will usually be smaller.
More fun
Besides drawing folds, there are many more things to learn about!
Here are but a few examples of objects and concepts to get your creative mind working.
---------------------------------------------------------
That's it for today's drawing lesson on how to draw clothes and folds. The lesson did focus almost solely on folds, but I find that after you learn how the draw these, learning how to draw each individual clothing item is a cinch. As always, I recommend you to go outside and observe and draw folds on real people and real clothes. Don't make it obvious though, that you are drawing them (; .
Also, check out my new website and subscribe for a FREE eBook! (=
LironYan.com
See you on the next drawing lesson!
- Liron
Hey world!
In this drawing lesson, we will learn how to draw a boat!!!
Every time I do a lesson like this, that requires some knowledge on how to draw something, I make a little study on what I'm drawing. This time I wanted to show you some of the work I made on studying how different boats look from different angles.
Lets get down to business!
Here is the basic shape of a boat:
This may seem funny and too simple, because most of us DO know how a boat looks, but this was very important for me, since I didn't know EXACTLY how a boat looks and "behaves" in space, especially from below, or from other different angles.
Here are some more different angles and perspectives in which I drew some more boats.
This was mainly for me, so I could choose an ideal angle to draw in. I also shaded some of these for my own fun.
Now its time to choose an angle / perspective, and start with a rough sketch. For more information on perspective, check out my previous lesson here: How to draw in perspective - one point.
Here I built the extremely simplified, rough sketch of the boat:
What I'm worried about now, is getting the lines in the correct places, especially the longer ones. Also, I make sure the lines are congruent with the perspective (you can try and find the vanishing point on the left, outside the canvas...).
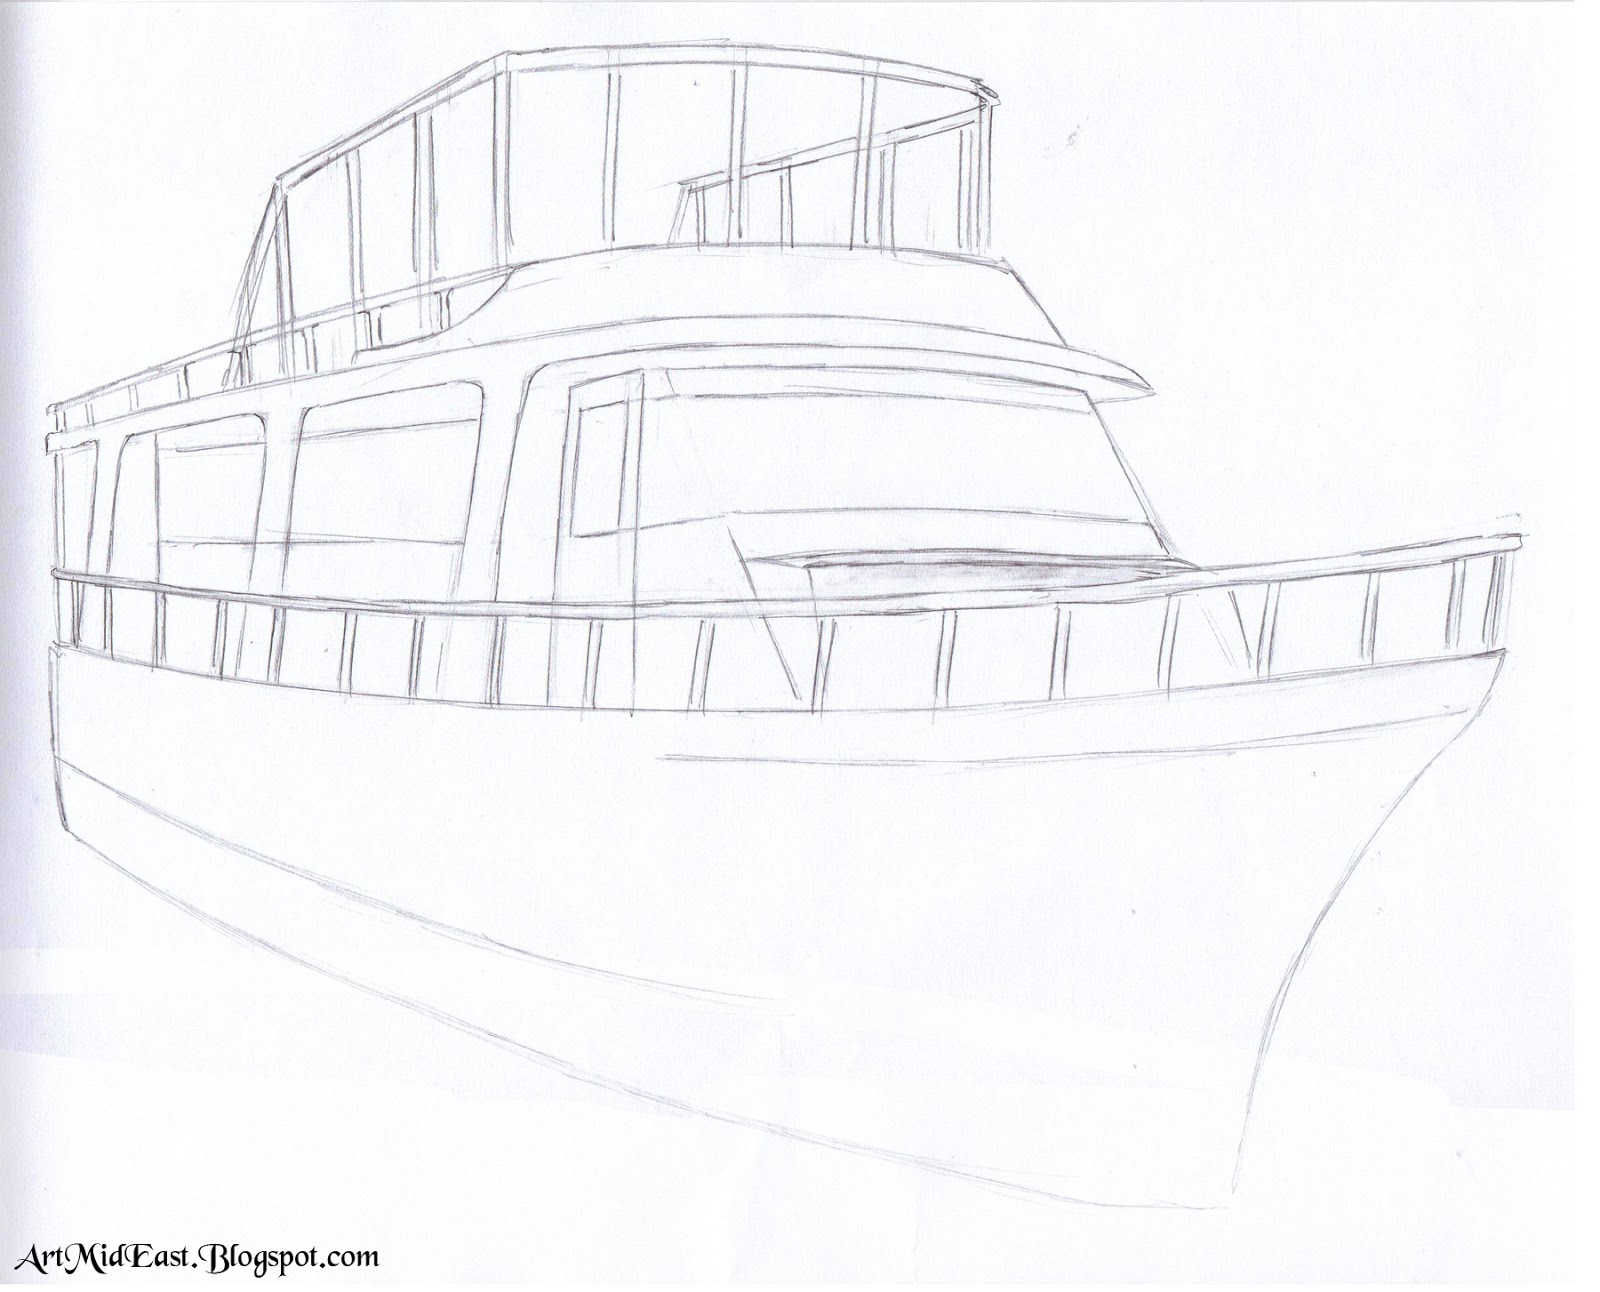
Now its time to add in some details:
I added more to the structure itself, as well as a preparation for the windows and guard rails. All of these details are conforming to the perspective I set up.
Now its time for the real deal:
This took the major bulk of my drawing time, since I added so many details and objects to the boat. This is basically the final version BEFORE the shading process. I added, the ropes (including some ripples in the water), the windows, the small signs, the post, some small objects like the lights and horn, and cleaned some unnecessary lines.
----
Check out my new website and subscribe for a FREE eBook! (=
LironYan.com
----
About the windows:
Notice how on the previous step I drew long lines for the windows, and in this step I divided them into the windows and erased the lines. This is a really neat trick for getting many lines correctly, since the windows are at the exact same height.
Now its time for the shading! For a more detailed shading lesson, check out this drawing lesson: Sketching and Shading techniques.
Here are some examples of me shading the door and windows:
A useful tip - put a small piece of paper under your hand, so you won't smear your drawing. This is especially important if you do a pencil shaded drawing, because most of the lines aren't going to be erased!
like this:
I didn't put much thought into the water, and used my instincts to draw them. As you will see in a moment in the final version, I made sure to get some ripples around the ropes, and also the reflection / shadow of the boat's body.
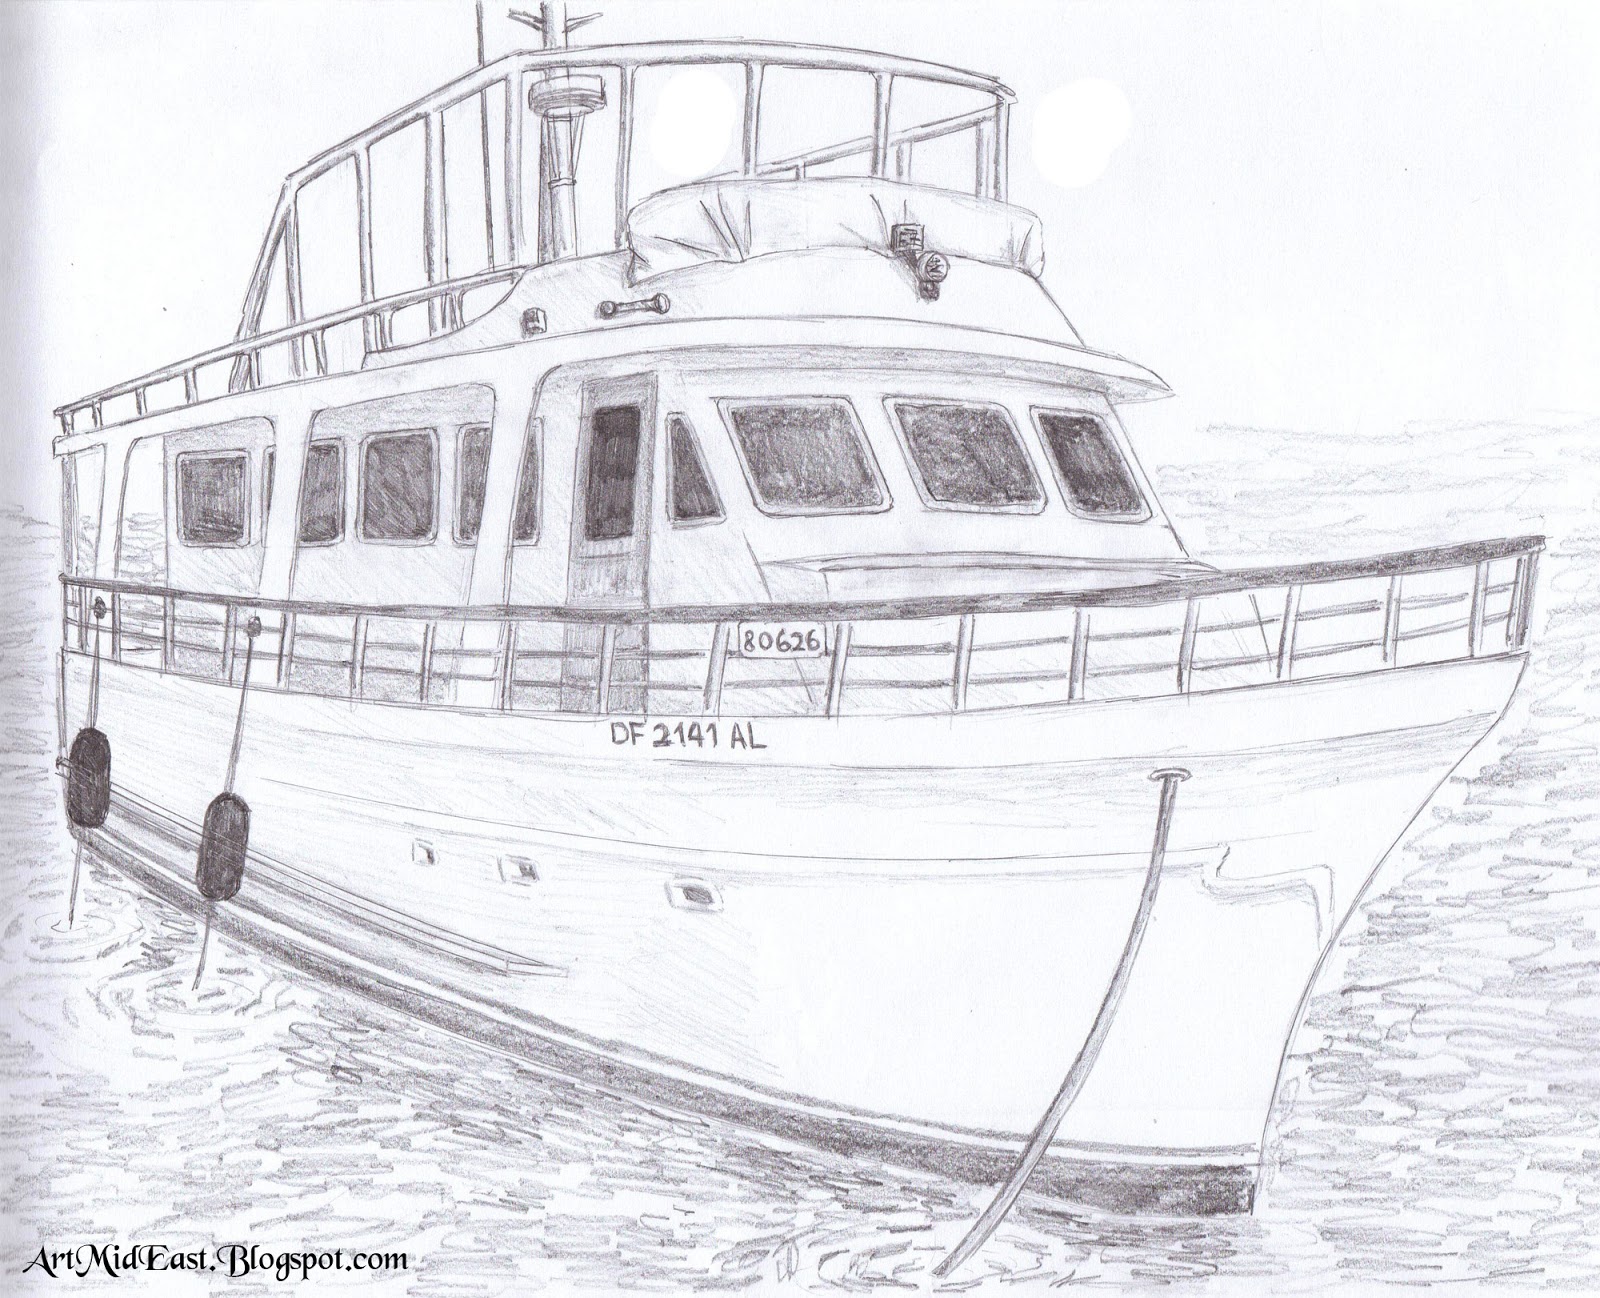
And here is the final version!!
I think this one turned out really cool, and even though I made some minor mistakes on the first steps (with the basic sketch and perspective), it still turned out nice and even a bit realistic.
This is it for today's drawing lesson. Hope this gave you some inspiration to go out and draw your own boats. I suggest going out and actually taking pictures of real boats, and then using them as your reference, which is actually what I've done here!
Next lesson will be very fun, and will discuss a highly requested topic, so keep your eyes open and stay tuned... (;
Also, check out my new website and subscribe for a FREE eBook! (=
LironYan.com
Peace,
- Liron.